Remove the rings not the Caffeine!


One of the best things about working from home is that I can have a proper cup of tea whenever I want. Unfortunately hot drinks do leave rings and by the end of the day I can be left with an overwhelming sense of shame as I count how many rings I've drank that day! So instead of giving up drinking so much tea (which is madness!) I have decided to make myself some coasters.


I came across these gorgeous coasters on Pinterest and fell in love. They're very easy to make and you don't need many materials which is great for a girl with, currently, a very rudimentary craft box. 

You can find the full tutorial including a free PDF of the pattern on the  How About Orange blog which is currently resigned. Sad face. But all of Jessica's tutorials and downloads are still there for you to use. Happy face. 


The only change I made to the steps Jessica provided was that I stuck the pattern piece to a cereal box just because it made it easier to cut around as felt seems to stretch and move as you cut around a paper template even if you've pinned it down.


Also, because I only had black felt which doesn't show the design as well as the blue felt used in the tutorial, I stuck my coaster to a small piece of leftover white felt which I think gave it a nice finish. 

I really enjoyed making it, even though it was a bit fiddly at times, and I will make more but probably in different colours next time. 

Button Bonanza

So you may have sensed a theme this week since I launched my new logo and what better way to finish it off than with a button themed Tiddlybits?


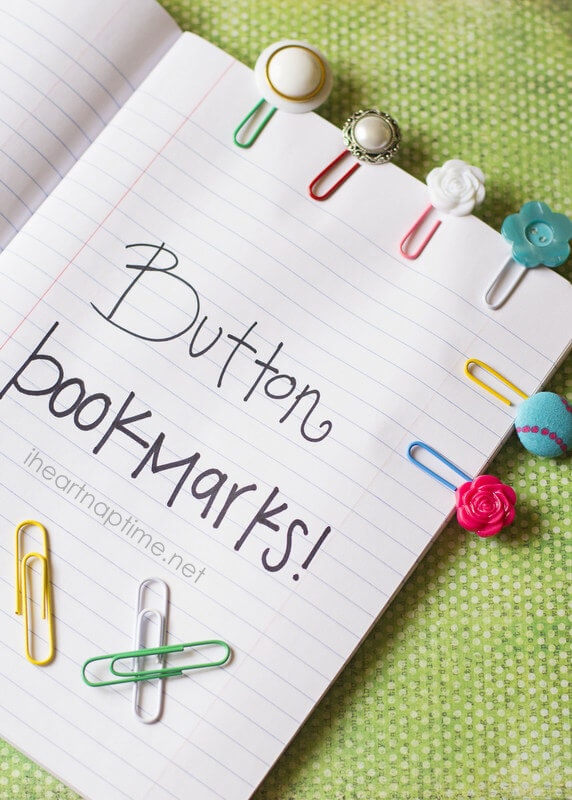
One of my biggest crimes is that I tend to dog ear pages when I'm reading a book. Not so much a problem when I'm reading my own books but definitely a problem when they belong to friends! I find big paper bookmarks quite cumbersome so these Button Bookmarks from iheartnaptime.net are perfect for me and super easy to make! 


Continuing the book theme these Matchbox Button Holders are genius plus holding them will make you feel like a giant! You can find the mini tutorial here including the link to the free printable book cover templates.

Another simple craft idea from Big Box Detox and their Tutorial Tuesday's is to turn your old buttons into fridge magnets for keeping your bills and other bits super organised and looking pretty even if you can't pay them! 


I also love this idea from Martha Stewart for making your napkins look super cute and chic. So simple but so elegant!


I am definitely going to make this Giant Glitter Button myself. I can't think of a better craft project for the Tiddlybobs office but it would be the perfect addition to any sewing/crafting house and a great one to get the kids involved in though maybe not the drilling! 

If all this isn't enough to inspire you to undertake a button themed project then please check out my Pinterest board for more button inspiration.


Sewing Dreams Come True

Today is the best day! I have been given the most beautiful sewing machine. Look at it - it's so pretty. My boyfriends great aunt no longer wanted it and so she's very kindly gifted it to me. It's in fabulous condition and hasn't been used since it's last service so she's got a lot of life in her yet.

The only problem now is figuring out how to get it home.... oh yeah and the small matter of learning to sew!


Button Biscuits

As it was biscuit week on Great British Bake Off and in honour of my new blog logo I decided to try my hand at baking some button shaped biscuits. The recipe I used was from this blog post by 2011 GBBO finalist, Holly. 

It's a great recipe but unfortunately I didn't have the equipment so I improvised with the cookie cutters and glasses I could find in my house including using a chopstick to create the holes! This meant that my biscuits were a lot bigger than the ones Holly made and this affected the cooking time so I wasn't sure when to take them out! In saying that I think I guesstimated pretty much on the button (PUN!!!) and they came out looking great if a little uneven in thickness! But who cares once they taste great right? 


New Logo!


Look at my new logo!! It's awesome right?

All credit goes to Josh O'Brien who is a fantastic illustrator and also, luckily for me, my fantastic boyfriend! I've included my recent favourite pictures of his below but I would highly recommend you check out his blog and work at http://www.joshjobrien.com.


Brown Paper Packages Tied Up with String....

Hello my name is Amy and I am addicted to gift wrapping. It's true. I'm completely obsessed. See Exhibit A below. I think it makes a present much more special if you put some time and effort into the wrapping of the gift (super extra bonus points if you hand make the gift!) so this weeks Tiddlybits is all about inspiring you to be a bit more creative in your wrapping escapades!

EXHIBIT A
(I was giving my Mam the Great British Sewing Bee book so decided to use that as a theme for the wrapping!)

This list from Buzzfeed is just a wonderful collection of quirky and different ideas. I will definitely be trying the cereal box idea and will post pics to Tiddlybobs when I do. I also really love the use of chalk paint! So clever!


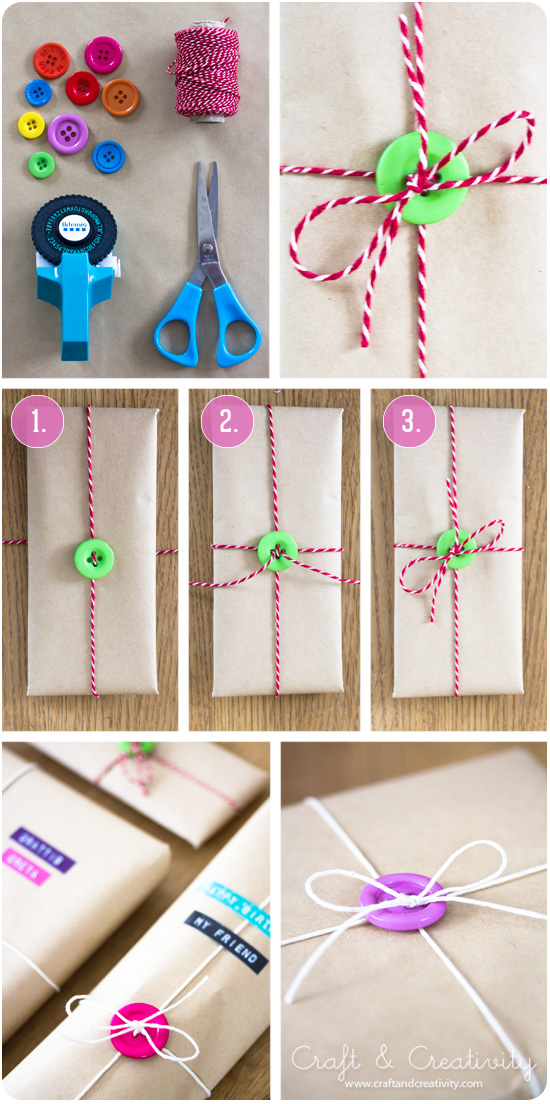
Everyone has random buttons in random drawers all over the house right? Right?! *cradles buttons* Well you should because buttons are awesome and one of the many things they can be used for is gift wrapping! Check out this awesome tutorial from the Craft and Creativity blog.


I'm pretty sure the only people that love gift wrap more than me are children so why not go all out for their wrapping? I love this monster idea from the Housing a Forest site. My nieces are definitely going to get monster wrapped gifts this year!!


This is just the sweetest idea and I demand all of my friends get married right now so that I can use it. However, should my friends not fulfil my demands I might do a twist on it with Fairytale characters for their birthdays instead!


That's a wrap (PUN!!) on this weeks Tiddlybits! Keep coming back for more crafty inspiration!


Tissue Pom Headband


So Boomtown Fair has announced this years fancy dress theme as "Outrageous Carnival" and as it's fast approaching I decided to put all that I learned from making tissue paper poms into action and made myself a colourful headband fit for carnival madness! Can't wait to rock it out at the festival!


PiƱa Colada Cupcakes


I wasn't sure about blogging about my bakes here on Tiddlybobs, as I began it with the idea that it would just be about my journey into (and hopefully progression through!) the world of crafting. However, I've been reading a lot of advice about blogging lately and the one thing that crops up the most is to blog about what you love and baking is definitely one of my loves! I've always dabbled in it over the years being the daughter of a woman who bakes the most delicious things in the world, but over the last year I have baking a lot more (since moving in with four other people means I don't have to eat everything I bake anymore!) and I love trying out new recipes and learning new techniques. So I think I will start adding my bakes to this blog but probably only the more creative projects I attempt and not just boring pictures of Victoria sponges!


My most recent bake was some piƱa colada cupcakes. 

I recently visited a craft fair in Oxfordshire and bought some piƱa colada curd from the lovely people at Cherry Tree Preserves  and was dying to use it in a recipe. I just made a standard batch of vanilla cupcakes. I then spooned out a small hole in the top of each cupcake and popped in some of the curd. I swirled butter icing over the top and added straws, umbrellas and gummy fruit shapes to give the idea of a piƱa colada cocktail! 


Tissue Paper Pom

Inspired by the fact that we have to make a colourful shrine for our next theatre performance at Boomtown Festival (I run my own theatre company, the Lab Collective. Check us out here.), I decided to make some colourful tissue paper poms but first I had to learn how to make them. So after looking at several tutorials on Pinterest I got my materials together and made my own.

Materials

* Large sheet of tissue paper (any colour!)

* Scissors

* Some thread/wool/string

* Jewelled stickers (optional)


Step 1

Fold you tissue paper in half once, then in half again and then in half again and cut along all the folds to create multiple sheets of tissue paper. 

(If you want smaller poms then fold in half more times before cutting and if you want bigger poms fold in half less!)


Step 2

Fold your sheets into an accordion stack and then tie the thread around  the middle to hold it in place. 


Step 3

Cut a rounded edge on both ends of the accordion stack. You could also cut pointy edges if you'd prefer or whatever shape you like as it just gives a different look to your pom. You also don't need to be too perfect about it as it I think it makes the pom more interesting when it's all not exactly perfect!


Step 4

Pull each layer of tissue paper up and out one layer at a time until you have a fluffy circle. 


Step 5


I wanted to experiment with decorating my pom this time so I added some jewelled stickers and a fancy ribbon (which I just tied around over the thread and had to 're-fluff' the tissue after to get back the shape!) to hang it and tah-dah! Pom complete!


Hope you all enjoyed my pom making tutorial and please do send me pictures of your own makes via twitter @Tiddlybobs

My First Craft!

So I finally delved into the world of crafts and finished my first project! I was sort of put off the other day when I discovered a lot of the projects I wanted to do were very expensive especially as I have no supplies and have to buy everything from scratch! But never fear the internet is here!! I found a lot of cheap and cheerful projects that don't cost much to do and mainly involve toilet paper rolls! So my first project is a handy holder for all my hair ties and bobby pins and I've made this weeks Tiddlybits all about toilet paper roll crafts to inspire you.

A hair tie, a hair tie,
my kingdom for a hair tie!

Hair Tie and Bobby Pin Holder

Usually my hair ties and bobby pins disappear as soon as I buy them (and I'm left sad and desperate with hair resembling something similar to the glorious photo to your right) so when I came across the idea for a holder on Pinterest I immediately knew I had to make one. Unfortunately there was a crafting disaster half way through but all turned right in the end!

Materials:

So first things first what did I use to make it -

- Toilet paper roll
- Glue (I used Pritt Stick)
- Scissors
- Pretty Paper (I used paper I got in issue 9 of Homemaker magazine)


Step One

I first rolled the toilet paper roll in the fancy paper and when I got to the end tried to glue the paper down. However, then disaster struck (yes on step one!) my Pritt Stick had lost its stick and was coming out in big lumps so in stepped Mr. Masking Tape to save the day!


Step Two

I cut four slits in the excess paper that was now on each end of the paper roll and began folding them down inside the roll. I then taped these bits to the inside of the paper roll using our trusty masking tape! When doing the other side I trimmed the excess paper before folding as it made things waaay easier so you should do that on both sides!


Cut four slits from the top of the excess
to the bottom and fold inside the roll.
You could also trim the excess before doing this
to make it easier to fold in and tape down.
A tip I've noted myself  for next time!


The hero of the hour 

Step Three

My holder was now complete! I just added my hair ties and bobby pins and messy hair has become a thing of the past!! 

Dr. Who approved!

Lessons Learned


So from doing this little project I discovered several things:

  • I should have used Modge Podge glue! Pritt Stick just doesn't cut it in the world of crafting!
  • Have some clear sellotape or other invisible tape around as masking tape does not look that attractive when all over your crafting project of awesome!
  • Always trim the excess paper as it makes things less fiddly

I hope you enjoyed reading about my first foray into crafts and blogging about it and I hope it inspires you to make your own toilet paper roll crafts! For way more inspiration on this check out this weeks Tiddlybits which also includes a link to the tutorial that inspired this project. 


Toilet Paper Roll Heaven

The blog post that inspired my first craft was from the awesome Whimsically Homemade blog which is awesome and her tutorials are great so do check it out!


Below are lots more exciting ideas for Toilet Paper Roll crafts that hopefully will inspire you to re-use yours. 


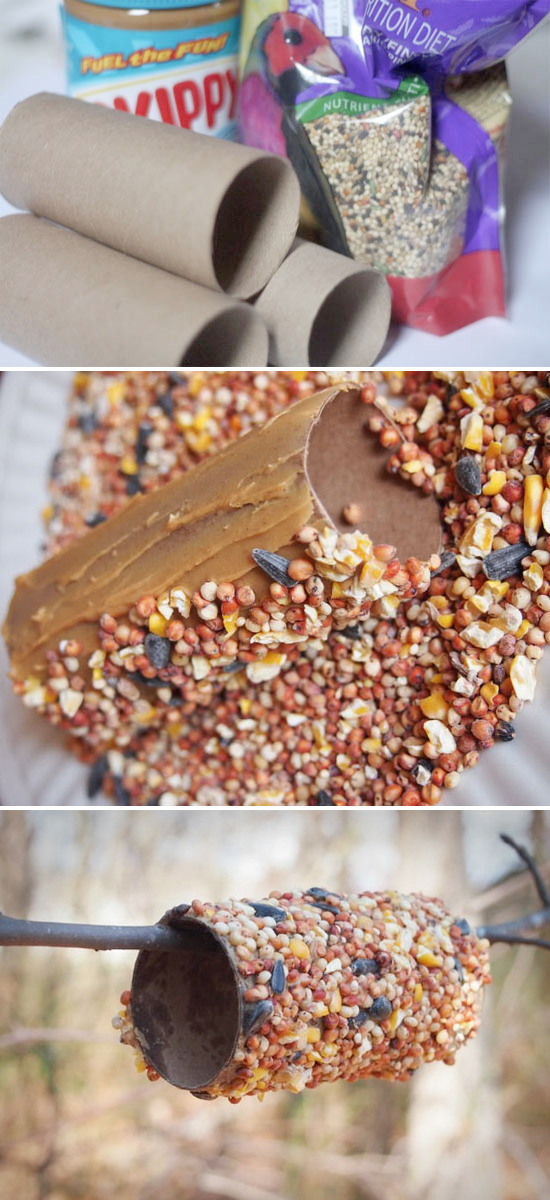
  A Toilet Paper Roll Bird Feeder    
      
Storybook characters created 
from toilet paper rolls! 
A gorgeous Toilet Paper Roll Wreath from Hungarian Blog - Crescent Old Lace. The tutorial is in Hungarian but there's loads of step by step pictures so you should be able to follow it and get a beautiful wreath at the end!


Maybe even create your own
Toilet Paper Roll Art

That's it for this weeks Tiddlybits! See you next week for more craft inspiration!


This Old Thing Inspires

So exciting evening! I finally got to catch up on Dawn O'Porters new programme 'This Old Thing: The Vintage Clothes Show" on Channel 4. I love this woman for so many reasons but particularly for all the photos of the fabulous outfits she posts on her instagram which give me a daily dose of clothes envy! 

I never get the chance to buy clothes as I'm usually broke but I adore clothes. I love looking at them, feeling them, imagining the looks I could put together etc. but unfortunately this adoration very rarely gets to leave my imagination. As soon as I enter a clothes shop Miss Imagination seems to go "Oh no! You're on your own here. Call me when you're done" leaving me alone in the middle of a shop with hundreds of items and no idea what to do with them and how to put them together, There is no point in looking at the mannequin for inspiration as my body has about forty more curves than it and all in the oddest places you can think of! So, instead, I revert back to my old tradition of a) buying a dress which can be worn on its own so don't have to worry about matching or b) something coloured that I can team that with one of many black items in my wardrobe! I then end up very quickly hating what I've bought as I'm frustrated by myself and the fact that I'm not wearing on the outside what I feel on the inside!

So in steps Dawn's new show to save the day! It really addressed all the worries I had about vintage/second hand shopping - the not worrying if you don't find anything, what to do if something doesn't quite fit and great ideas on how to put outfits together for all body types! I also loved the up cycling of old clothes into something new. Feeling inspired I decided to put what I had seen to practice straight away. 


I recently acquired this stunning top from my Nanny (a.k.a my grandmother to all you non-Irish folk!) but wanted to do something more exciting with it than put it with my usual black especially as  it's Summer and the weather is boiling!! So I had a rummage around my wardrobe and found and old blue skirt - perfect! One thing that the stylists (Dawn?) on the show did was they accessorised really well so I also added a brown belt (which was a very good life choice I feel) and VOILA! A new bright summery outfit was born!


I also did some sixties hair with bright lipstick and dark eyes just to give it more of a stylish feel! 


And I LOVE it!!! I will definitely be wearing this look out and about! 

Thanks for the inspiration Dawn and team!!

NOTE: I know this post doesn't technically count as a blog post about crafts but hopefully it will inspire you to create something new out of your old clothes or just wear them with something different! Here's the link to Dawn's scrapbooking page for more inspiration!