Showing posts with label Christmas. Show all posts

What's a Pakkekalender?

The making and giving of a Pakkekalender is a tradition which comes from Denmark. It involves making a gift calendar in any form you like but there must be 24 different gifts (whether they be toys, books, little poems, sweets etc.) and you give the whole calendar to someone else on December 1st and they then receive 24 little gifts in the run up to Christmas. Such a sweet idea!

For the next 8 days or so I have the privilege of facilitating workshops for Tiger to tell people about Pakkekalenders and help them to make one. It's been so much fun so far and so wonderful seeing families make something together and how pleased everyone is with their finished product. 

I have been able to make my own Pakkekalender already which was so much fun and made me realise how much I miss making things. 


I choose a red, what and brown theme which was a real challenge for me as there were so many other colours to choose from but it made be really inventive in the different ways I could use the materials and I surprised myself with some of the ideas I came up with!

I would like to give this Pakkekalender away to someone on December 1st so if any of you like the design please let me know by November 22nd and I will fill it with presents tailored to you and send it off to you in time? Just e-mail me at tiddlybobs@gmail.com

And if you're dying of crafting envy and fancy coming along to a workshop to make your own, please find more information here.

Deck the halls with piles of icing!!

Unfortunately getting caught up in the Christmas madness has prevented me from doing anything crafty but fortunately my two nieces and I changed all that today by making some colourful Christmas biscuits! 


It was great to be creative with my hands again especially with my two favourite little people while singing songs from 'Frozen' and running screaming from Bears half way through - we may have consumed a little too much sugar and went crazy for a bit! 

The result was hilariously messy but I think you'll agree still tasty looking! I also wanted to use the finished product as a way of thanking each of you who voted for Tiddlybobs in the UK Blog Awards and shared the link. Unfortunately I didn't get through to the next round but it meant a lot to know how many of you are enjoying reading the blog and I can't wait to post more creative inspiration in the New Year. 


Deck the halls...

CHRISTMAS IS SO CLOSE!!!

Yes I may have already overdosed on sweets and Christmas films but there's still time to craft up some quick decorations before the real fun begins. This weeks Tiddlybits has some great ideas on projects for you to try and don't forget to visit the Pinterest board for lots more. 


First up is this gorgeous wall hanging from 20 North Ora. I'd love to make a wreath for my front door but I have no idea where to find the greenery and I can't afford the greenery or afford the base they need to go on so this wall hanging offers an awesome alternative. 


I tried this idea myself last year and I love it. It's such a great and easy way to add Christmas cheer to doors and cupboards. However, last year I didn't add a gift tag and think it's a brilliant idea so thanks to Liz on Call for that one! 


So, if like me, you've started the Christmas celebrations already, you may have some wine corks lying around the house. Instead of dumping them, why not turn them into colourful Christmas decorations that you can from year to year? This tutorial from Joy's Life is awesome and more importantly easy to do and for those of you with children, it's one that they can get involved with too. You could also use glue to sprinkle them with glitter too! 


And if, you've got wine corks then you must have wine bottles too! Follow this great tutorial from Born in '82 for a clever way to turn them into beautiful decorations. Super simple but so elegant and decorations you'll have for years!


Also, if you have old magazines or no idea what to do with the toy catalogues after you've finished writing your list to Santa, why not try making these gorgeous paper ornaments from them? A beautifully simple idea from Stephanie Lynn

And because we don't restrict ourselves to crafts here at Tiddlybobs, why not try your hand at creative baking and make a Santa bread?


How cool is that?? Love this idea from Taste of Home and hopefully will get a chance to try so keep your eyes peeled for that! 


Sock Garland Advent Calendar

As followers of this blog will already know, recently I was gifted with a beautiful, old Singer machine from my boyfriends grand aunt. I was super excited as so many crafting techniques and projects require sewing and I just don't have the time or patience to do it all by hand! However, my first attempt at using it didn't go too well. It ended with me crying on the bed while my boyfriend used a screwdriver to remove a clump of thread from the inside. I was defeated and scared and the beautiful old sewing machine was put back in it's case.

Luckily, it kept shouting from the end of the bed to be used and my favourite craft magazine, Homemaker Magazine, came with an easy sewing project for beginners that month so I plucked up the courage to try again. This time, the thread clumped again but I fixed it, read a bit more of my user booklet, adjusted the tension on the machine and away I went! I finished my first sewing project on my own machine! Huzzah! 


I was so happy that I immediately hopped onto Pinterest to see what my next project could be and then it hit me. An advent calendar. The one I made two years ago didn't have big enough pockets to hold the sweets and that really annoyed me so I decided a new advent calendar would be the best project. There were so many ideas to choose from but I loved all the garland based ones so much that I decided to do one in that style.

So out came the old Christmas tea towels (4 to be exact about it!)...


Out came some sock drawing skills, which I didn't know I had, to make my template. I first drew it on paper, added a 1cm border as  a seam allowance and cut it out. Then I glued it to some cardboard and cut it out to have a firm template to use on the tea towels. 


I then drew around the template 12 times on each tea towel making sure to turn the template every second time. This ensures that once all the socks are cut out, each pair will have the right side of the tea towel facing out when pinned together.


Once all the socks were cut out I had 48 single socks pinned into 24 pairs. Then it was time to sew.  Originally I was going to sew them on the wrong side and then turn them out but when I had them all cut I liked their size as they were so I decided to sew on the right side instead. Scarily, on my first sock, this happened...


But I just took a breath, ripped it out, adjusted my tension (as I learned previously!) and off I went. In no time I had 24 beautifully sewn socks. Thanks to the boyfriend I also, and a beautifully new pair of pinking shears so I used them to trim the edges. And yes my sewing wasn't perfect, so many of the borders became smaller than the others post pinking resulting in various sized socks but that's the joy of homemade right? Right guys?! .... Right?


I was then ready to hang my garland. I had bought some lovely red twine which I weaved in and out of the bannister on my stairs and then tied it in place. I had also bought the adorable pegs below - I know, for shame, I should have made them too but one step at a time guys!


I then pegged each sock to the twine, popped in the sweets and my beautiful advent calendar sock garland extravaganza was complete!


I can't express how happy I am with the finished result. I can't stop looking at it and smiling. Seriously, if you haven't made anything for your home for this Christmas yet do it now! I can't tell you how wonderful it feels to have something you made yourself hanging up and looking so beautiful.  I think I might finish this project crying on my bed too but this time they will be tears of joy. 

Yes. Crying over tea towel socks. I am still cool. 

It's the final countdown!!

This week I have started making my own advent calendar which will soon be revealed on this blog but in the meantime I thought I'd give you a few advent calendar ideas, in the form of this weeks Tiddlybits, so that you might be inspired to make your own. 


From the queen of all things crafty, Martha Stewart, comes this delightful matchbox advent calendar. Each day the matchbox is turned around to reveal a piece of a Christmas themed picture, in this case a Christmas tree but you could pick your own. You can also place sweets inside the boxes or perhaps rolled up pieces of paper with wishes or activities to do together on them. 


I love this box garland advent calendar from Crafts Unleashed. It's super easy to make and you can add your own flair by mixing up the colours and number design. You could also think about making the boxes yourself out of recycled toilet paper rolls.

As followers of this blog may know, I have discovered that there is nothing that you can't do with a recycled toilet roll and advent calendars are no exception. 


Take for example Morning Creativity's super charming advent calendar house made from toilet rolls covered with brown paper. I bet this is sooooo much fun to break into each day and see what's inside! I think I would paint the roof too or perhaps make it into a Christmas tree shape rather than a house.


You could also cover your toilet paper rolls in fabric or paper and make this great cracker themed advent calendar from Mindy Pitcher. This is the perfect one if you haven't got much space as you can hang it on the back of a door or the side of a bookshelf. 


Or how about making your toilet paper rolls completely unrecognisable and turning them into this gift box advent calendar from North Story? This is such a beautiful idea and the tutorial is fantastic so you have no excuse not to make it!


Finally, I love this gingerbread man garland from one of my favourite food blogs Honestly Yum and as I was putting this blog post together, I thought why not ice numbers on to the gingerbread man and each day you could eat one? So I'm putting that out there into the world and if you make it, I want day 24! 

I could go on and on as there are so many creative advent calendar ideas out there but please check out the Tiddlybobs Christmas Pinterest Board 'Snow is falling...' for some more ideas as well as many many more craft ideas for the holiday season. I will be updating it all the time so make sure you follow that board!

Thank you for reading and happy crafting!

Folding Frolics!

As you may have seen on Tiddlybobs already this week, I have been trying my hand at napkin folding and this got me wondering about what other crafts you can make using folding and TAH-DA this weeks Tiddlybits was born!


There are so many wonderful things you can make for your tables using napkins and soooo many tutorials available online in blogs and on YouTube. I loved this tutorial from One Good Thing by Jillee as it's a really sensible idea and can be used for every occasion; you can just theme it by changing what napkins you use! The simple ideas are always the best. 


Another great idea is to create beads from old scraps of paper or magazines that you have about the house. These beads can then be turned into necklaces or bracelets simply by stringing them together. You could even purchase earring clasps and make a unique and beautiful pair of earrings out of them. This tutorial from Cosmo Cricket is really in depth at showing you how the technique works and it's so easy, I'm not sure why I haven't done it before!


As the picture says, this tutorial from Peppermint Creative shows you how to make paper stars by folding (there is also glue involved but we don't mind that here!). It's a really pretty idea and with Christmas coming up it might be a great way to make a star for the top of your tree. 


Speaking of Christmas, how gorgeous are these folded Christmas trees? In this great tutorial from  The House that Lars Built these have been sprayed with gold paint and glitter but if you picked paper with a festive pattern, you wouldn't need to get the paint out at all! 


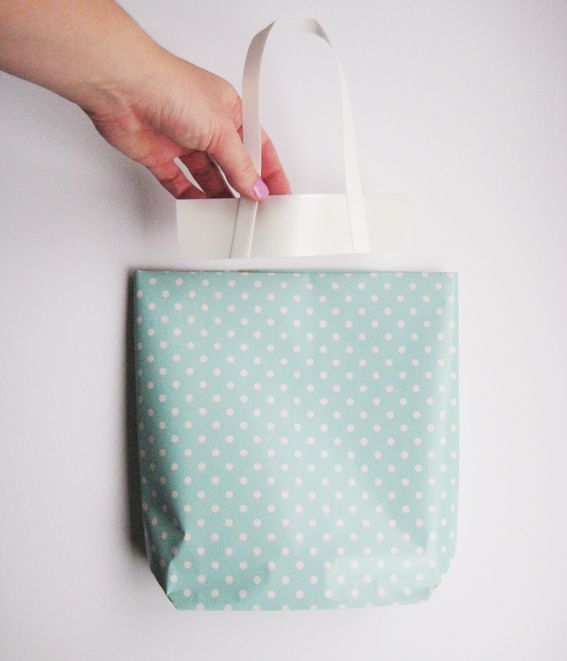
If you're thinking of Christmas and you think like me, then you're thinking of gift bags. This simple tutorial from Hello Sandwich is great for showing you how a bit of folding and some sellotape can create gorgeous gift bags. Don't forget that handles can be made from string and/or ribbon too!


Accordion books are definitely more complicated than just a bit of folding but still they are not impossible to make and are definitely well worth it. This tutorial from Design Sponge is the best I've come across on how to make one. They are a great away to create journals of specific events like your wedding or graduation. They can also be used as memento books. For example you could use it as a travel diary where you can stick photos, ticket stubs, diary entries etc. and you could even decorate the cover with a map of your trip.   

And finally, like last week I am going to end this weeks Tiddlybits with a video tutorial showing you how to wrap your presents in old shirts (or new ones that could form part of the gift!). But all of this  is really only the tip of the iceberg in folding crafts - please visit my Folding Fun Pinterest Board for even more inspiration. 


The pitter patter of elven feet!

Christmas decor preparations here at Tiddlybobs HQ continue with napkin folding. My housemates and I have our own Christmas day before we all split home and go our separate ways for our family Christmas days so I am thinking of ways to decorate our table. I love making things out of napkins ever since I learned how to make a pirate hat at my first job. And then I came across this tutorial video on how to make an Elf boot out of a napkin and I almost died with excitement (Yes I am that sad!). 


It's a really easy to tutorial to follow but at the end I folded it down (like the slipper!) and then turned up the toe to make it more elf like. 


Bah Humbug!

So it's that time of the year - the time when everyone moans about Christmas decorations and presents being in the shops and IT'S ONLY November!! Trust me I've been there. As someone who was born in December, my birthday is always overshadowed by the build up and I've been adamant every year not to celebrate Christmas until after my birthday!! 

But this year it's different. This year I want to have a crafty Christmas and a crafty Christmas requires a LOT of prep so I am glad that the shops have their stocks of Christmas ribbon out now and that shelves are adorned with little trinkets to add character to my makes or simply inspire. 

And it's making me happier. I've realised that Christmas is the time when I usually stop and take stock and be happy for my friends, family and all the good things in my life so why not start doing that now? I probably should do it all year round but I don't. I get caught up in all the petty little things I shouldn't and forget but the fairy lights in the shop windows and low playing Christmas carols are a reminder to be happy for what I have. 

So I'm officially a convert. Let's start celebrating in November and spread the joy a little longer!! 

My boyfriend disagrees with all of the above and refuses to celebrate until at least December 1st so I made him this wreath.


It was made from a free gift that I got in Issue 24 of Homemaker magazine which was a polystyrene wreath. I then covered it in black ribbon by wrapping it around and pinning the end in place. I then wrote 'Bah Humbug!' on a sticky label, cut out the shape and stuck it to the wreath. 

Easy peasy and it made him smile so totally worth it! 

Around the World Blog Hop

I was tagged for the Around the World Blog Hop by Lisa on her beautiful blog The Quilting Bird. Thanks for the tag Lisa and for opening my eyes to Zenia's blog A Quilted Passion.

The Around the World Blog Hop is kind of like a chain letter except it's with blogs on the internet.  It's a great opportunity to meet and learn about other bloggers.  When tagged, the tagee has to acknowledge who tagged them, answer 4 questions and then tag 3 different bloggers. If you can't find 3, one will do (see the bottom of the post for my three!)!

So here goes...

What am I working on?

Currently I'm just gathering ideas for Christmas projects. I want to make a new advent calender and decorations for our tree. Also, because money is tight, I will probably making some presents for people so need ideas to make them look as expensive as possible!

How does my work differ from others of its genre?


I guess what features on my blog differs from the many other craft blogs out there because I am just a beginner. A lot of craft blogs out there are from the perspective of crafters who have an established product or products and are selling them whereas I am just figuring out and documenting the basics.

Why do I write/create what I do?

The aim of my blog is to inspire crafters of all levels to just get the glue out and make. I think crafting is such a joy to do and is wonderful for your mental health particularly nowadays when everything is so instant and rushed; it's nice to work with your hands and have to take time to complete a project.

In my weekly Tiddlybits, I put together a list of links to all the great ideas I come across on Pinterest in the hope that they inspire people to create wonderful stuff of their own.


This week I've also featured creative baking ideas as I also love baking and think that's another great with to get creative and might suit people who don't want to spend hours elbow deep in Papier-mâché!

How does my writing/creative process work?

For the posts about the crafting projects I attempt, I take pictures for every step of the project and then I will either create a step by step tutorial using the pictures and written instructions or if it was a relatively simple project, just let the pictures do the talking! I usually write a little about why I decided to take on that project and the lessons I've learned from the process too.

For the weekly Tiddlybits, I pick a theme usually sparked by something I've found in my house and I wonder about all the different things you could do with it. I then create a secret board on Pinterest and pin all the great ideas on the theme I find in there. Then I pick out 4 or 5 favourites and pop pictures of  them in a blog post with comments on why I think they're so good as well as links to the blogs/websites where they were originally posted.


For my new Morning Walks feature, I just take pictures when me and my boyfriend are out walking. I edit them in Photoshop creating a collage of the various photos and then upload that to Tiddlybobs. As the aim is just to inspire people I don't usually write anything in order to let the pictures speak for themselves. 

Who am I tagging?

It's EXTREMELY difficult to pick three as there are so many great blogs out there but these three are my current favourites! 

My first tag goes to Tinkered Treasures who's blog is so beautiful and cute especially the recent Girlie  Office feature - which I am now totally jealous of! 

My second tag is for Turquoise Autumn which is full of stunning photos and I love the Wilderness Wednesday posts. 

And finally, The Villa on Mount Pleasant  who creates the most stunning vintage interiors and gives me serious house envy. 

To peg or not to peg

Sticking with the theme of using stuff you find around your house for your crafting projects, this week's Tiddlybits is all about the weird and wonderful things you can make from clothes pegs. 


First up are these easy to make clothes peg magnets from the Daily Fix and though I love the floral design, the great thing is that you can mix it up with any design you want. I'm seriously considering Harry Potter themed magnets... if only I can get my housemates to agree...


This has been pitched as kid sized for kids but I'm sorry it's way too awesome! I demand you find yourself a larger box and make this adult sized! Genius idea from U Create!


So this blog post is not in english but the pictures are really good so you should be able to follow the tutorial quite easily. It's such a great idea and reminder that peg crafts don't just stop at the wooden bits!


Too many cables? Too little time? This is a genius idea for a pin cable tidy and plus there's a few other ideas if you're looking for more inspiration to support your technical organisation needs.


Okay so this is not a tutorial nor is it credited to anyone as I couldn't find the source but I couldn't resist posting it. It's a Christmas tree made from pegs to hold lollipops! Do you understand how much of that sentence is soooo right?

And on that note, that's it for this weeks Tiddlybits. Please check out the Pinterest board for more clothes peg crafting inspiration!


Toilet Paper Roll Heaven

The blog post that inspired my first craft was from the awesome Whimsically Homemade blog which is awesome and her tutorials are great so do check it out!


Below are lots more exciting ideas for Toilet Paper Roll crafts that hopefully will inspire you to re-use yours. 


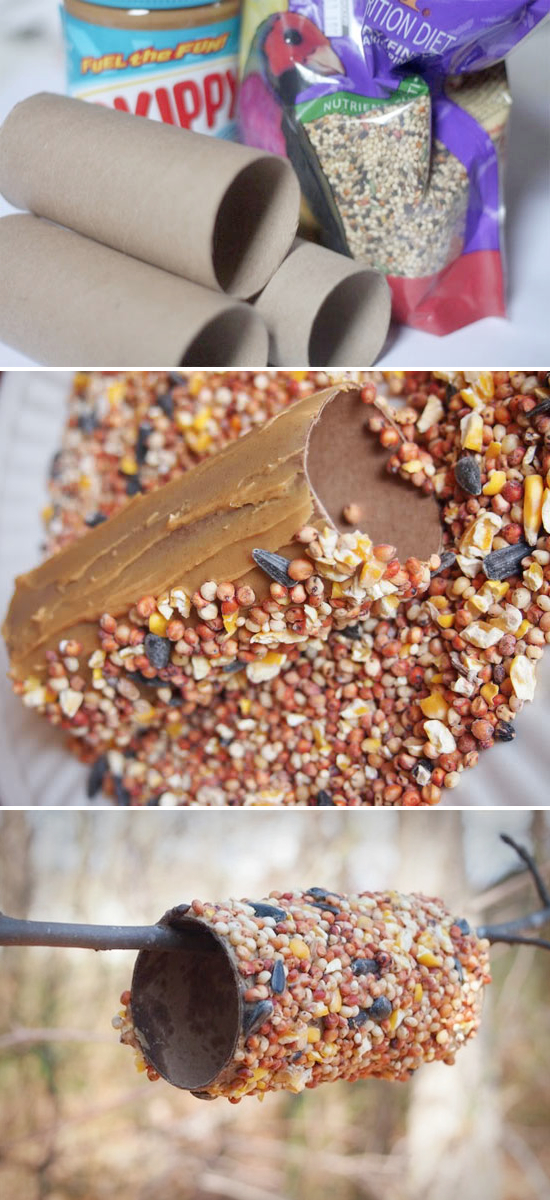
  A Toilet Paper Roll Bird Feeder    
      
Storybook characters created 
from toilet paper rolls! 
A gorgeous Toilet Paper Roll Wreath from Hungarian Blog - Crescent Old Lace. The tutorial is in Hungarian but there's loads of step by step pictures so you should be able to follow it and get a beautiful wreath at the end!


Maybe even create your own
Toilet Paper Roll Art

That's it for this weeks Tiddlybits! See you next week for more craft inspiration!