Showing posts with label craft. Show all posts

A very crafty birthday

I was super blessed this year with a wonderful birthday surrounded by all my fabulous friends who have made moving to London the best decision I've ever made. Not only that but everyone absolutely blew me away with all their thoughtful presents and not only that but I hit the craft girl jackpot!


I got the cutest new knitting bag which is exactly what I needed as my other one was bursting it's so full! 


I also got this great little kit for building your own bird feeder which is super handy considering I've and two bags of bird seed in my press for the last two years and should really get it out to the birds....


As readers of this blog will know, I love colouring in and I equally (okay, maybe a little bit more..) love Harry Potter and some genius has combined this two into the Harry Potter colouring book, of which I got not one but two!! I was also given lots of colouring pencils and pens which means I can start colouring straight away! HAPPINESS overload.  


Unfortunately, the lovely woman my mother did home help for passed away earlier this year but she left a legacy of a life of crafting behind her. So much wool, crochet patterns, material that she probably could have had her own shop. One beautiful thing she left behind was this unfinished embroidery project which my mother sent to me. It's such a beautiful pattern and I can't wait to finish it and turn it into a beautiful cushion which will always be a reminder of this awesome woman. 


My family and friends also did something wonderful with their present buying - they supported independent artists. The awesome print is from Emily Mc Dowells studio. I love the sentiment of it and it's a mantra I'm going to try and take into my life going forward. I hate getting things wrong though so it may take a while.... 

The calendar below is from the awesome The Native State which not only is one of my favourite instagram accounts to follow but also makes awesome inspirational arts and stationery. Be sure to check them out. If nothing else happens at least I'm going to be inspired next year! :) 


Not only did my friends support independent artists but they became artists and got very creative with their envelopes and cards. This card is probably the greatest card I've ever received. Handmade is the best way. 


And finally the pièce de résistance.....


Meet Phoebe! Although I love my old singer sewing machine, it's impractical if I want to attend workshops or bring it to another workspace as it's so heavy so my wonderful mammy and daddy gifted me with this shiny, new, lovely beast of awesome! I am so excited to get started and finally get making some actual clothes... well trying to, at least. 

As you can tell I am super set up for a crafty year so expect a lot more making and blogging in the New Year. 

Thank you to all my friends who gave me such thoughtful presents, craft related and non-craft related. You are all wonderful people who made me feel so special and loved. xxxx

What's a Pakkekalender?

The making and giving of a Pakkekalender is a tradition which comes from Denmark. It involves making a gift calendar in any form you like but there must be 24 different gifts (whether they be toys, books, little poems, sweets etc.) and you give the whole calendar to someone else on December 1st and they then receive 24 little gifts in the run up to Christmas. Such a sweet idea!

For the next 8 days or so I have the privilege of facilitating workshops for Tiger to tell people about Pakkekalenders and help them to make one. It's been so much fun so far and so wonderful seeing families make something together and how pleased everyone is with their finished product. 

I have been able to make my own Pakkekalender already which was so much fun and made me realise how much I miss making things. 


I choose a red, what and brown theme which was a real challenge for me as there were so many other colours to choose from but it made be really inventive in the different ways I could use the materials and I surprised myself with some of the ideas I came up with!

I would like to give this Pakkekalender away to someone on December 1st so if any of you like the design please let me know by November 22nd and I will fill it with presents tailored to you and send it off to you in time? Just e-mail me at tiddlybobs@gmail.com

And if you're dying of crafting envy and fancy coming along to a workshop to make your own, please find more information here.

How to make a pinhole camera

This morning all parts of the UK will experience a partial solar eclipse (the best since 1999 apparently!) but experts have been warning to not look directly at the sun when it happens so what should you do so that you don't miss this wonderful spectacle? Make a pinhole camera of course! 

What you need:


  • A Cereal Box
  • Tinfoil
  • A scissors
  • White paper
  • Sellotape
  • Something to make your hole 


Firstly, cut out a piece of white paper and sellotape it to the bottom of your cereal box. This will make it easier to see the projected image of the eclipse. 


Next, cut two slots either side of your cereal box and tape the middle together. 


Cover one of the slots with tinfoil. 


I then used a needle to poke a hole in my tinfoil but the size doesn't really matter so you can vary the size with anything you have to hand. 


And there you have it. All you have to do is bring your camera out and face your pinhole in the direction of the sun while you look into the box through the other opening - you should then see the projected image of the eclipse not he white paper. 

Unfortunately, for me, there were too many clouds so my pinhole camera never got used! All I saw was a cloudy sky change to a slightly darker cloudy sky! 


If you want to see what it would have looked out please check out this tutorial from Hilaroad which I followed to create mine. 

Interview with Scribble and Sew

Recently I came across a lovely business on Twitter called Scribble and Sew where children's drawings, paintings or doodles are turned into embroidered works of art as keepsakes, gifts or just to hang on your wall. They were running a competition to win a free commission and I entered and won!!! 


Amy, who runs the business, was super lovely to work with and super quick! Over the course of only a few days we and gone from agreeing the design to the beautiful piece landing on my doorstep. The piece was of a picture my niece had drawn. She had been bird-watching when I was visiting, and inspired by my illustrator boyfriend, decided to draw pictures of all the birds she was looking at. I thought that this drawing was the perfect project for Amy from Scribble and Sew to work on. She loved the idea and thought it would be great to put the birds in a tree too. Below is the drawing and the finished product - isn't it awesome?!


I loved Amy's work so much, I decided to find out more and interviewed her for Tiddlybobs! 

Amy is the owner of Scribble and Sew. She is almost 30 and has been married for seven years. As well as being a step mum she has two cats called Pickle and Pumpkin (cute or what?).

Amy, what inspired you to start Scribble and Sew? 

My Nan and Mum both taught me to sew starting with cross stitch samplers,  I have my first completed one, a home sweet home sampler by my front door. I always try to make or sew something for friends birthdays & christmas. It wasn't until, sadly in 2013, I lost both my Nan and Mum that it forced me to re-evaluate certain things and start focusing on doing more for myself and that is when Scribble & Sew went from a hobby to a little business.


What's a typical day for you when you're working on a new project?

Well I work full time so I fit my project's in whenever I can. It's brilliant that you can take it everywhere with you, on lunch breaks, while my daughter is at her gymnastics lessons, when I get in from work. My favorite time to embroider is with a big cup of tea and with Murder She Wrote on the telly, I'm a smidge obsessed with Angela Lansbury (I have her portrait tattooed on my leg!)

You create your wonderful designs using embroidery. What are your top tips for someone just beginning to use this technique?

My top tips...It may seem obvious but practice and lots of patience. It can take along time to produce a finished hoop. I would say to start simple just using back stitch to create solid lines then when you are comfortable with your stitch length you can move on to slightly more complicated stitches such as split stitch which is what I favour. There are such wonderful tutorials online and don't be afraid, you can always unpick.


Which has been your favorite project?

This is a relatively new venture for me and it came about from little embroidering portraits of wrestlers for my husband. I just thought it was a lovely way to show your child's work other than on the fridge And also I thought they would make lovely mothers day presents of for grandparents. I have two favorite pieces so far - they are a brilliant little rocket and some very cute little birds that needed a home, so I placed them in a tree.


What is the best and worst thing about running your own creative business?

The best thing about running my own creative business is being able to do something that I truly love doing and being able to create unique pieces that mean so much to the lovely people who ask for commissions.

And the bad? Hmmm, well I don't think it is necessarily a bad thing but not being able to run Scribble & Sew as my full time job - perhaps a little way down the road this might happen... fingers crossed.

I love running Scribble and Sew and it makes me ever so happy not just that I get to sew everyday but because I get to create wonderful keep sakes for lovely people. Children have a fantastic view of the world and I feel very humble to be asked to capture these little moments with a craft I enjoy. 


If you want to find out more about Scribble and Sew or if you think a custom piece would be the perfect Mothers Day gift then visit Scribble and Sew on Twitter or Instagram

Boiled, Scrambled or Painted?

So we all know you can paint eggs and there are many people out there who have taken that to a whole new level and created masterpieces on shell BUT did you know you could do all this??


This fantastic Egg Totem Pole from Mr. P for example. A great decoration for a room or if you glue a piece of wood or a plate to the top you could create an awesome candle stand. 


We've all heard of message in a bottle but what about this? Surprise your Valentine by ditching the Hallmark card and sending a sweet message in an eggshell.  This great tutorial from Poppytalk shows you how with beautiful pictures.


Or why not vent some stress and anger by filling eggs with paint and throwing them at some canvas? Love this idea from Crystal Underwood on Growing a Jeweled Rose - soooo messy and fun and you have something to hang on your wall at the end! Brilliant!


Speaking of filling your eggshells with stuff - fill them with wax and create beautiful candles. You can leave the wax in the shell like these candles from Kidspot or you can peel the eggshell off and create egg shaped candles like those below from Andrea at Guide Central.


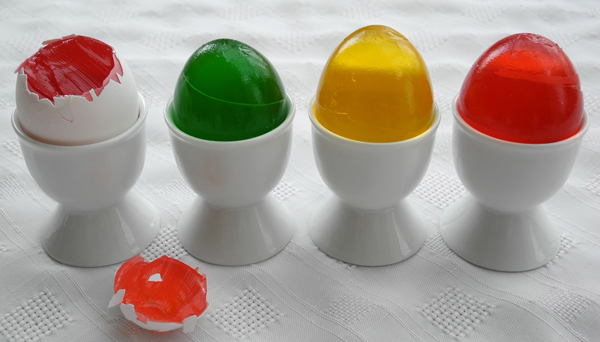
You can also use the technique to create the most awesome craft that I think is possible with eggs - JELLY SHAPED LIKE EGGS!! Yes that's right! JELLY!!!


It's just amazing. And so joyful. Thanks to Steph at Oh Happy Day for creating and blogging about this. 

Have an Eggcellent time crafting!
(see what I did there!)

Say Cheese!

I live in rented accommodation and currently I'm trying to figure out little ways to make our space feel like our own. I think one of the best ways to make a room more personal is by adding photographs to it. Unfortunately hanging photo frames often means holes in the walls which equals an angry landlord so I've been looking up alternative ways to display our photographs. 


Most people now have a set of chunky letters in their house so I love this idea from Petia Mitchell on Shutterfly to use them as a way to display photographs. You could also add old ticket stubs or other mementos to make them even more personal. 


Turning photographs into dancing cut-outs is such a brilliant and silly idea! It's great! Here's the tutorial from Sweet Paul and I love the suggestion of adding magnets to the back so you can stick them to your fridge. 


Speaking of magnets, this tutorial from Sundaesins is a gorgeous and cute way to turn your pictures into magnets. I like how she added a polaroid photo border to each but you could use borders of different colours and shapes to your liking instead and to give a bit of variety. 


Tonia on eHow made this awesome photo jigsaw as a fathers day present but you could just make one to keep on your coffee table and maybe put a different photo on each side of the cubes so you can have six different jigsaws. You could even just display the jigsaw in it's box on a bookshelf or mantelpiece. 


You could also follow this tutorial from A Beautiful Mess and learn how to transfer photographs to fabric. You could then add your photographs to cushions and blankets to make the ultimate personal soft furnishings and your landlord can say nothing about it!

I would also recommend getting some blender pens so you can add photographs easily to your journals like FP Jana has done here or display lots of photos at once by creating some collages from your digital photographs and then display the collages instead  - Pic Monkey is a great site to do this and helped me create the photo strip below.  Now I've just got to make a decision on which way to display it. 


I hope this has inspired you to get creative with your photographs and add an an extra personal touch to your home. I'd love to see pictures of your projects so feel free to comment or tweet me @Tiddlybobs.

Deck the halls...

CHRISTMAS IS SO CLOSE!!!

Yes I may have already overdosed on sweets and Christmas films but there's still time to craft up some quick decorations before the real fun begins. This weeks Tiddlybits has some great ideas on projects for you to try and don't forget to visit the Pinterest board for lots more. 


First up is this gorgeous wall hanging from 20 North Ora. I'd love to make a wreath for my front door but I have no idea where to find the greenery and I can't afford the greenery or afford the base they need to go on so this wall hanging offers an awesome alternative. 


I tried this idea myself last year and I love it. It's such a great and easy way to add Christmas cheer to doors and cupboards. However, last year I didn't add a gift tag and think it's a brilliant idea so thanks to Liz on Call for that one! 


So, if like me, you've started the Christmas celebrations already, you may have some wine corks lying around the house. Instead of dumping them, why not turn them into colourful Christmas decorations that you can from year to year? This tutorial from Joy's Life is awesome and more importantly easy to do and for those of you with children, it's one that they can get involved with too. You could also use glue to sprinkle them with glitter too! 


And if, you've got wine corks then you must have wine bottles too! Follow this great tutorial from Born in '82 for a clever way to turn them into beautiful decorations. Super simple but so elegant and decorations you'll have for years!


Also, if you have old magazines or no idea what to do with the toy catalogues after you've finished writing your list to Santa, why not try making these gorgeous paper ornaments from them? A beautifully simple idea from Stephanie Lynn

And because we don't restrict ourselves to crafts here at Tiddlybobs, why not try your hand at creative baking and make a Santa bread?


How cool is that?? Love this idea from Taste of Home and hopefully will get a chance to try so keep your eyes peeled for that! 


What to do when you've run out of Jam...

This week I attempted my first ever swiss roll and after three failed attempts I was successful - Hooray!

Look at that swirl!

But after so many attempts I was all out of jam and I wondered what sort of cool things could I make with a jam jar? And so this weeks Tiddlybits was born!


I think a lot of people made these Jam Jar glitter Globes in school but with Christmas just a round the corner maybe it's time to bring back this classic and now with your more grown-up taste add a bit of elegance to it like this beautiful one from Whimsical Wonderland Weddings. Plus if you've forgotten how to make them, there's a handy tutorial too.


There are plenty of ways to cover your jam jar lids, whether it be with paperpaint or using kids toys, and turning them into awesome storage jars but I particularly love this idea from One Bowl Parenting. I do a bit of embroidery and hand sewing so this pincushion lid and thread storage jar is  great for keeping all the little bits needed in one place, as they always find a way to get lost. It would make a great gift for anyone starting to sew. 


Speaking of storage ideas, these vintage string holders from Handmade Charlotte are a fantastic idea. You could also use them for ribbon storage too I guess. I love the way Charlotte lays out her tutorials with great pictures and a fun font, so I'm sure you'll have great fun following it and making your own. 


Another idea that I think is becoming very popular, particularly at weddings, is using jam jars as glasses. Why not go one step further with yours and etch a cute little message on them? It's super easy and super chic. I recommend this tutorial from You Seriously Made That? if you're going to try it. 

And finally, a bit different for Tiddlybits but this week I decided to end on a video. Video tutorials can be invaluable especially when you a re trying something for the first time and there is pretty much a video for every skill you could possibly want to learn. This weeks video shows just how simple and cheap crafting can be, so you've no excuses not to get started! :) 


Bah Humbug!

So it's that time of the year - the time when everyone moans about Christmas decorations and presents being in the shops and IT'S ONLY November!! Trust me I've been there. As someone who was born in December, my birthday is always overshadowed by the build up and I've been adamant every year not to celebrate Christmas until after my birthday!! 

But this year it's different. This year I want to have a crafty Christmas and a crafty Christmas requires a LOT of prep so I am glad that the shops have their stocks of Christmas ribbon out now and that shelves are adorned with little trinkets to add character to my makes or simply inspire. 

And it's making me happier. I've realised that Christmas is the time when I usually stop and take stock and be happy for my friends, family and all the good things in my life so why not start doing that now? I probably should do it all year round but I don't. I get caught up in all the petty little things I shouldn't and forget but the fairy lights in the shop windows and low playing Christmas carols are a reminder to be happy for what I have. 

So I'm officially a convert. Let's start celebrating in November and spread the joy a little longer!! 

My boyfriend disagrees with all of the above and refuses to celebrate until at least December 1st so I made him this wreath.


It was made from a free gift that I got in Issue 24 of Homemaker magazine which was a polystyrene wreath. I then covered it in black ribbon by wrapping it around and pinning the end in place. I then wrote 'Bah Humbug!' on a sticky label, cut out the shape and stuck it to the wreath. 

Easy peasy and it made him smile so totally worth it!