Showing posts with label creativity. Show all posts

Return to Crafting

Hi all you Tiddlybobbers!

Sorry for the long absence but a lot of personal problems have kept me away from blogging for a bit. However, things have now begun to steady out a little so back to my craft desk I go.

I am lucky enough to have incredible friends and a group of them bought me a Hobbycraft gift card for my last birthday. I have spent hours on the site putting things in the basket and taking them back out and putting them back in again but finally I selected my chosen items and my box of awesome craft supplies arrived yesterday. 

Mmmmm... crafty goodness!!!

And it was just in time as today is the rainiest day in a long time so absolutely perfect for many cups of tea and lots of crafting. 


I've made a few projects today. I've become quite self-reflective in the last few months and have begun journalling. A bit part of that has been jotting down all the inspirational quotes I come across.


So I decided to bring this into our house and energize my housemates with an inspirational word on our wall. 


The wooden word is from Hobbycraft and was super cheap. I painted it in a lovely acrylic blue and popped it on the wall with Bluetac so now, as we descend our stairs every morning, we are inspired to do what we do best. 


The wall above my bed is very blank and I've been contemplating what to put on it for ages. I saw another wooden word on the Hobbycraft website and it instantly stimulated a project idea in my head. 


I painted the word in the same blue acrylic paint and then added gold glitter to some wooden pegs. I then hung some string with clear tape and hung up some clouds I had cut from white paper. Voila! A super cute way to brighten up my blank wall.


The final project involved my favourite crafting skill - embroidery. I bought a plain pencil case to keep all of my craft tools (pom pom makers, paper cutting knife etc.) in and brightened it up with some simple stitching and my favourite buttons. 


Feels so good to be making things again and I can't wait to post about more of my creations int he future. Sorry if I bore you to tears!

Interview with Sophia Cadogan

I am very lucky to have spent my teenage years developing my creativity with a local youth theatre group, Kildare Youth Theatre. I had the most wonderful opportunities there, least of all becoming friends with some of the most magical people I have ever met. One in particular, Sophia Cadogan, has also been the embodiment of beautiful things since I met her and now she is bringing that to the world through her artwork. 

Sophia recently started posting pictures on her Instagram of her gorgeous pieces combining watercolours, exquisite typography and of course, my favourite, glitter!! The second I saw them I knew I wanted one so I asked Sophia to commission me a piece around one of my favourite quotes "We are the music makers and we are the dreamers of dreams." I was so excited about what she would make and I wasn't disappointed for when this showed up on my doorstep I almost peed myself with joy! 


I also asked Sophia if she would like to be interviewed for my blog so I could find out more about how she creates such wonderful work and share that with you in the hope start it might inspire you to indulge in your own creativity. 

Enjoy!

Has art always been a passion of yours or is it just something you've come to recently?


I have always loved art. Since I was able to hold a pencil I've been trying to draw. I began using Disney VHS covers as reference images in the 90's and slowly progressed from there. Art was my favourite subject all through school and through college, drawing and painting continued in between essays and assignments! In recent years I've had less time for it (what with creating a tiny human who now takes a fair amount of my time and attention) but as this tiny human became a tiny bit more independent (for like 10 minutes at a time anyway), I've been able to get back to it. Since I am currently working random, sporadic hours, I'm at home a lot with the tiny human so I decided that I might as well turn that aul hobby into something useful! Who says your passion can't pay your bills?? (Well, here's hoping!)


You are using watercolours in your most recent work - are they as difficult to work with as everyone says they are?


Um, yes! well no. Well, ehhh.. you see. I'm mostly self-taught when it comes to, well, most of this so I'm always terrified that I'm not even using the correct techniques. I have very little patience so oils never suited me, I like acrylics for more detailed pieces but for these illustrations I'm working on at the moment, the watercolour splashes work really well and I find it’s a really effective, vibrant look that’s quite simply achieved. It is very VERY easy to overwork them though, so knowing when to stop is very important I find! Less is ALWAYS more.


Is there anyone or anything that inspires your work or does it all just come from your imagination?


Inspiration is constant. I have a little ideas thread on my phone and in random notebooks that I jot down notes in as ideas come to me throughout the day. I could be searching through images or something idiotic on the web or flicking through books, just walking down the street and something will strike me as a possible idea. If anyone were to read it thought it'd be hilarious, oftentimes its just a meaningless string of gibberish or crap that I thought made sense at the time - ''hourglass-...ravenclaw-...why skin attached?... spill some popcorn- monopoly? '' -- just an example, Don't. even. ask. 

I get really inspired by other artists, I was in Madrid recently in the Reina Sofia and swooned over Guernica and the other Picasso pieces there, so  I came back and it was all geometrics, angles everywhere! I also saw some incredible war inspired drawings that really affected my line drawing technique. I was the weirdo in the gallery squinting as close as possible to the pieces without the surly guards coming to drag me out the door. 

I also fucking love street art, there's a few amazing accounts on Instagram that are constantly inspiring. At the moment I am having a major moment for Joe Caslin, his recent project 'Our Nation's Son's' around Ireland is unreal. 

There's so many incredible illustrators out there at the moment too. Instagram is a great place to discover new talent. I adore aymsdesigns, found her instagram account a good while ago and she's been a great inspiration - to be so young and use her talent to build her own business is so awesome. 


What are your favourite and least favourite parts of creating a new piece?


My favourite part is when the idea is still in my head and the page is blank because then I cant possibly fuck it up and its still mine and perfect and flawless, haha, no honestly, My favourite part is probably just seeing it coming together in the final stages (when I haven't messed it up). I also love initial sketches, there's something raw and lovely about an unfinished sketch, (although some would say that's just my laziness). 

My least favourite part is definitely my inevitable fuck up. I don’t think there is a single piece that I've completed and thought, yup, 100% flawless! Those little imperfections help me to learn for next time though and make every piece unique I guess (or something something about making excuses for myself!). I also, love the part where it's all finished and mounted and done, and I can finally be proud! I spent years with just scraps in sketchbooks so it's so satisfying now to see some ideas become finished pieces. 


If someone wanted to start creating work like yours - what would be your number one tip?

Try. and try and try over and over again. and mess up, fail and then try again. If you want to be an artist, make some art, and then do it over and over and over and over again.  I used to go on and on about starting up something like this or getting more serious about my art but as long as the ideas were all safe in my head and I hadn't tried, I therefore couldn’t fail. I could be comfortable in the fact that 'I could do it if I want'. Once I got over that fear of failure and actually embraced it (cuz you're gonna fail, a lot) I slowly, slowly began to have little successes and then I found I was doing something I could actually be proud of. (There should probably be a Beckett quote around here somewhere).

Also, invest in a ruler. I eventually had to admit to myself that I am not a super human and NO, 'true' artists don't know how to draw perfectly straight lines (why the hell was I labouring under that illusion??). Rulers aren't for nerds and squares, they're for super hip artists too. Rulers for life. #rulernation


What's your favourite piece of work that you've produced and why?


I hate them all equally. 

HA, no ok, It's hard to pick a favourite. I am AWFULLY fond of this watercolour I made for my mates' apartment. Probably it's because it was the first attempt at a portrait with watercolours and my first actual commitment to using my art in a non-hobby way. (I'm sure there's a better way to phrase that). Plus I'm really chuffed that it is actually in my friends' home (they didn’t just humour me and chuck it in the bin) which I think was confirmation that I could maybe, just maybe do this whole 'art' thing. 


Also this: because It's on a wall in an actual house and that’s awesome and also because I can mural and I did not come up with a more natural and creative way to slip that in to this interview! Plus look! A toilet!


Extra special bonus question!! 


Could you tell us about how you create your pieces especially the lettering and what drives your choices?


Ok, so I adore typography and once tried to save for a fancy and stupidly expensive coffee table book that was purely about typography. I think my money ended up going on something boring instead like rent or feeding my daughter BUT there's always ye olde google! I love lettering, calligraphy, any sort of handwriting porn and so I've always tried to emulate that. I guess mostly I try out a few different fonts by hand until I find one that I feel would suit the tone of the piece. Ya feel me? 

Then I guess it's the composition is very important. You can go to class and learn about it OR you can wing it and mess up until you structure things in a way that doesn’t hurt your eyes and makes your picture-mind a happy mind. Whichever way works for you!! but, honestly, don't listen to me I'm just a dirty artist that’s trying her hardest to avoid getting a 'real' job. 


I hope you enjoyed reading this interview with Sophia Cadogan. You can follow her work via her Instagram account and even better, you can buy her work at her Etsy shop.

I can't wait to see what else is to come from this beautiful artist! 

Boiled, Scrambled or Painted?

So we all know you can paint eggs and there are many people out there who have taken that to a whole new level and created masterpieces on shell BUT did you know you could do all this??


This fantastic Egg Totem Pole from Mr. P for example. A great decoration for a room or if you glue a piece of wood or a plate to the top you could create an awesome candle stand. 


We've all heard of message in a bottle but what about this? Surprise your Valentine by ditching the Hallmark card and sending a sweet message in an eggshell.  This great tutorial from Poppytalk shows you how with beautiful pictures.


Or why not vent some stress and anger by filling eggs with paint and throwing them at some canvas? Love this idea from Crystal Underwood on Growing a Jeweled Rose - soooo messy and fun and you have something to hang on your wall at the end! Brilliant!

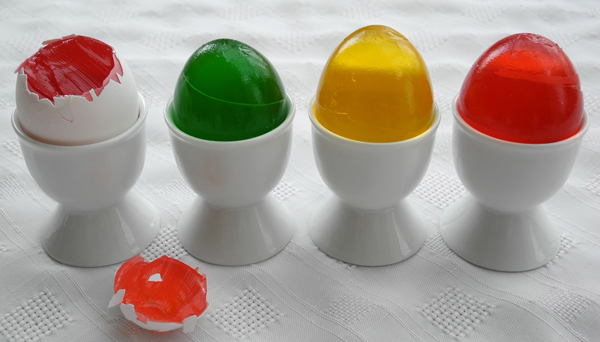
Speaking of filling your eggshells with stuff - fill them with wax and create beautiful candles. You can leave the wax in the shell like these candles from Kidspot or you can peel the eggshell off and create egg shaped candles like those below from Andrea at Guide Central.


You can also use the technique to create the most awesome craft that I think is possible with eggs - JELLY SHAPED LIKE EGGS!! Yes that's right! JELLY!!!

It's just amazing. And so joyful. Thanks to Steph at Oh Happy Day for creating and blogging about this. 

Have an Eggcellent time crafting!
(see what I did there!)

Say Cheese!

I live in rented accommodation and currently I'm trying to figure out little ways to make our space feel like our own. I think one of the best ways to make a room more personal is by adding photographs to it. Unfortunately hanging photo frames often means holes in the walls which equals an angry landlord so I've been looking up alternative ways to display our photographs. 


Most people now have a set of chunky letters in their house so I love this idea from Petia Mitchell on Shutterfly to use them as a way to display photographs. You could also add old ticket stubs or other mementos to make them even more personal. 


Turning photographs into dancing cut-outs is such a brilliant and silly idea! It's great! Here's the tutorial from Sweet Paul and I love the suggestion of adding magnets to the back so you can stick them to your fridge. 


Speaking of magnets, this tutorial from Sundaesins is a gorgeous and cute way to turn your pictures into magnets. I like how she added a polaroid photo border to each but you could use borders of different colours and shapes to your liking instead and to give a bit of variety. 


Tonia on eHow made this awesome photo jigsaw as a fathers day present but you could just make one to keep on your coffee table and maybe put a different photo on each side of the cubes so you can have six different jigsaws. You could even just display the jigsaw in it's box on a bookshelf or mantelpiece. 


You could also follow this tutorial from A Beautiful Mess and learn how to transfer photographs to fabric. You could then add your photographs to cushions and blankets to make the ultimate personal soft furnishings and your landlord can say nothing about it!

I would also recommend getting some blender pens so you can add photographs easily to your journals like FP Jana has done here or display lots of photos at once by creating some collages from your digital photographs and then display the collages instead  - Pic Monkey is a great site to do this and helped me create the photo strip below.  Now I've just got to make a decision on which way to display it. 


I hope this has inspired you to get creative with your photographs and add an an extra personal touch to your home. I'd love to see pictures of your projects so feel free to comment or tweet me @Tiddlybobs.

The pitter patter of elven feet!

Christmas decor preparations here at Tiddlybobs HQ continue with napkin folding. My housemates and I have our own Christmas day before we all split home and go our separate ways for our family Christmas days so I am thinking of ways to decorate our table. I love making things out of napkins ever since I learned how to make a pirate hat at my first job. And then I came across this tutorial video on how to make an Elf boot out of a napkin and I almost died with excitement (Yes I am that sad!). 


It's a really easy to tutorial to follow but at the end I folded it down (like the slipper!) and then turned up the toe to make it more elf like. 


May the craft be with you

It is no secret that I am a huge Harry Potter fan and all round lover of things classed as "nerdy" so what better theme for this weeks Tiddlybits than Nerd Crafts?!


It's often the simplest ideas that are the best and this tutorial from Dream a Little Bigger showing how to turn a Kleenex box into a piece of lego is genius!

Speaking of simply genius ideas why not turn your plant pots into your favourite superhero? Like Batman for instance (totally doing this!).  Thanks to Jan Tracy for pinning!


The ultimate dream for any Harry Potter fan is to own a real wand but alas that can not be. Console yourself by making yourself a fake but awesome one by following this tutorial from Please Give Peas a Chance


Or if you haven't got a glue gun to hand why not take out your scraps of paper and get quilling. You could make beautiful art like Ironman below or one of your favourite Sci-fi/fantasy characters. You can find more inspiration from The Mary Sue here.


Or if that seems too complicated, then follow the lead of Anthony Herrera Designs and download any one of these PDF patterns and make awesome Star Wars snowflakes for fantastic and unique Christmas decorations. 


I hope that's inspired you to get geeky with your crafts but if not head over to the Pinterest board where there are loads more ideas including creating jewellery from old remote controls and Lord of the Rings door hangers.

A Recipe for Colouring In

I am firmly aware that I am unable to draw and having a brother who is a graphic designer and a boyfriend who is an illustrator does nothing but confirm that. However, I do still enjoy having a dabble now again and there is nothing more relaxing in this world than colouring in - anyone that says differently is lying. 

I was kindly gifted with a blank recipe book last Christmas and today (Yes, only today!) I decided to start filling it. As I'm just learning to bake I don't have a lot of recipes that I do over and over again or even recipes that turn out the exact same the second time around except for this jam tart recipe. It's super quick and has yet to go wrong so I decided it deserved pride of place as the first recipe to be put in my book. 


The book contains a blank page on one side and lined pages on the other so it's just made for accompanying your recipes with illustrations - well, I thought so anyway. 

I'm pretty pleased with the result considering my drawing skills but besides that, it was super fun and just so relaxing to do! If you haven't done any drawing or colouring in since primary school, I demand that you do so straight away. You'll love it! Can't wait to master more baked goods so that I try out more recipe inspired drawings! 

Let her try and make a beehive out of me!

You may not be as evil as the Wicked Witch threatening to make a beehive out of your tin man but you can make many other wonderful things with them and this weeks Tiddlybits is all about just that!


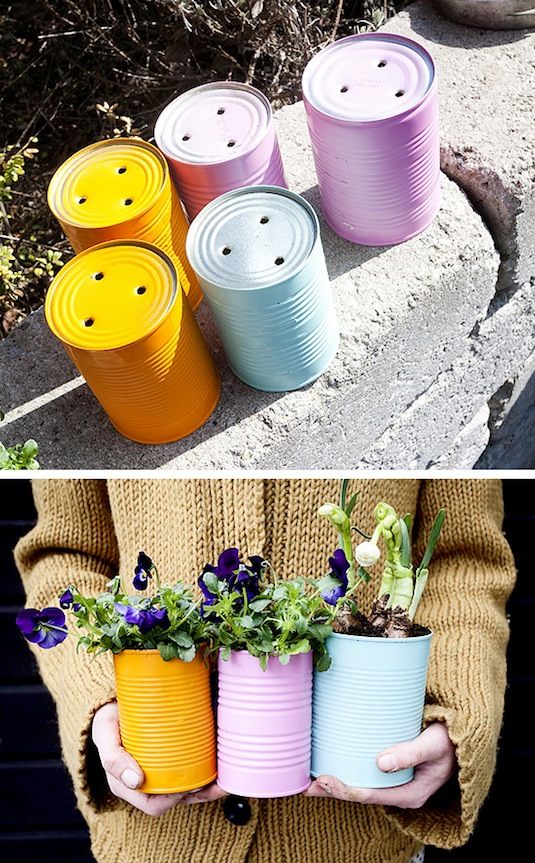
This gorgeous planters from Dos Family courtesy of their April Buddy Deer Dot are simply made by painting your tin cans and adding a few drainage holes with a drill in the bottom and voila! Beautiful, unique plant pots.


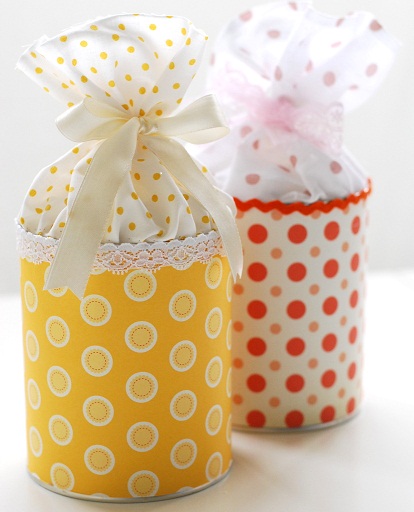
As you all know I am obsessed with gift wrap and I love this idea from BlingBling of using tin cans as wrapping for biscuits and sweet things. You can find the tutorial here. It's not in the english but the pictures are great so you should be able to follow it without much difficulty. 


This is a great idea from Design Sponge as part of their DIY Wednesday's for making a perpetual calendar from a tin can. You can also store your pens in it so it's perfect if you haven't got much desk space. 


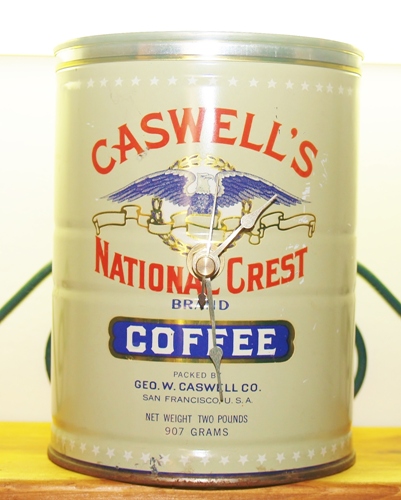
I love, love, love this idea of making a clock from an old tin can. So easy but absolutely brilliant result and I'm definitely making one of these for my desk. You can find the tutorial here on the Kelli's Kitchen blog. 


As we've not got long until the bad weather of Winter is upon us we need to grab a few more evenings in the garden before it's too late and what better way to set the mood then with these fabulous  tin can lanterns? And thanks to this brilliant tutorial from Grow Creative.

And if you're not satisfied with all of that, maybe you could try make your very own Tinman complete with a heart. 

Photo via Barbs Hackleton
For more tin can inspiration please visit my Pinterest board and happy crafting!


Remove the rings not the Caffeine!


One of the best things about working from home is that I can have a proper cup of tea whenever I want. Unfortunately hot drinks do leave rings and by the end of the day I can be left with an overwhelming sense of shame as I count how many rings I've drank that day! So instead of giving up drinking so much tea (which is madness!) I have decided to make myself some coasters.


I came across these gorgeous coasters on Pinterest and fell in love. They're very easy to make and you don't need many materials which is great for a girl with, currently, a very rudimentary craft box. 

You can find the full tutorial including a free PDF of the pattern on the  How About Orange blog which is currently resigned. Sad face. But all of Jessica's tutorials and downloads are still there for you to use. Happy face. 


The only change I made to the steps Jessica provided was that I stuck the pattern piece to a cereal box just because it made it easier to cut around as felt seems to stretch and move as you cut around a paper template even if you've pinned it down.


Also, because I only had black felt which doesn't show the design as well as the blue felt used in the tutorial, I stuck my coaster to a small piece of leftover white felt which I think gave it a nice finish. 

I really enjoyed making it, even though it was a bit fiddly at times, and I will make more but probably in different colours next time. 

Brown Paper Packages Tied Up with String....

Hello my name is Amy and I am addicted to gift wrapping. It's true. I'm completely obsessed. See Exhibit A below. I think it makes a present much more special if you put some time and effort into the wrapping of the gift (super extra bonus points if you hand make the gift!) so this weeks Tiddlybits is all about inspiring you to be a bit more creative in your wrapping escapades!

EXHIBIT A
(I was giving my Mam the Great British Sewing Bee book so decided to use that as a theme for the wrapping!)

This list from Buzzfeed is just a wonderful collection of quirky and different ideas. I will definitely be trying the cereal box idea and will post pics to Tiddlybobs when I do. I also really love the use of chalk paint! So clever!


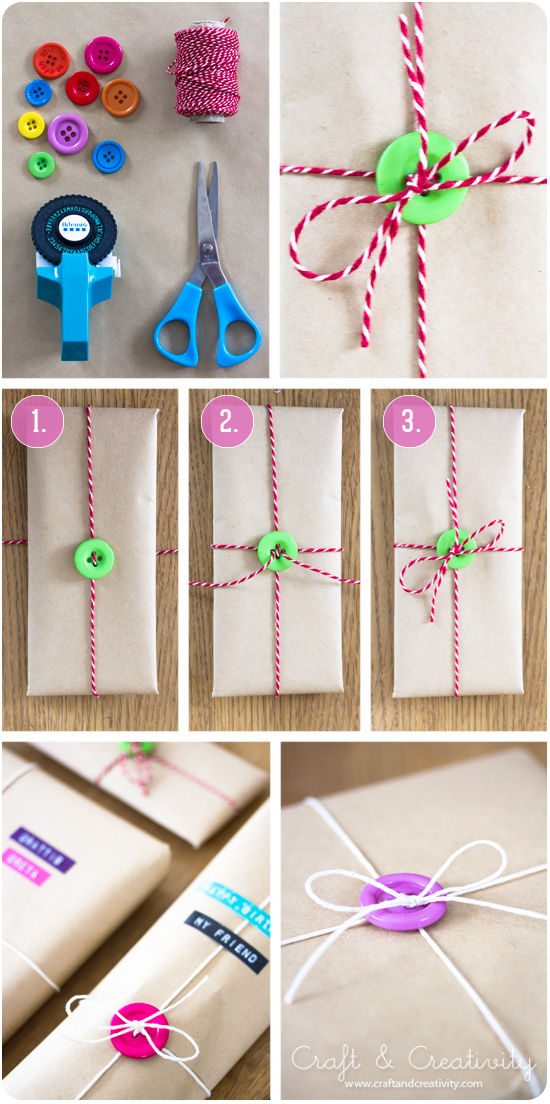
Everyone has random buttons in random drawers all over the house right? Right?! *cradles buttons* Well you should because buttons are awesome and one of the many things they can be used for is gift wrapping! Check out this awesome tutorial from the Craft and Creativity blog.


I'm pretty sure the only people that love gift wrap more than me are children so why not go all out for their wrapping? I love this monster idea from the Housing a Forest site. My nieces are definitely going to get monster wrapped gifts this year!!


This is just the sweetest idea and I demand all of my friends get married right now so that I can use it. However, should my friends not fulfil my demands I might do a twist on it with Fairytale characters for their birthdays instead!


That's a wrap (PUN!!) on this weeks Tiddlybits! Keep coming back for more crafty inspiration!