Around the World Blog Hop

I was tagged for the Around the World Blog Hop by Lisa on her beautiful blog The Quilting Bird. Thanks for the tag Lisa and for opening my eyes to Zenia's blog A Quilted Passion.

The Around the World Blog Hop is kind of like a chain letter except it's with blogs on the internet.  It's a great opportunity to meet and learn about other bloggers.  When tagged, the tagee has to acknowledge who tagged them, answer 4 questions and then tag 3 different bloggers. If you can't find 3, one will do (see the bottom of the post for my three!)!

So here goes...

What am I working on?

Currently I'm just gathering ideas for Christmas projects. I want to make a new advent calender and decorations for our tree. Also, because money is tight, I will probably making some presents for people so need ideas to make them look as expensive as possible!

How does my work differ from others of its genre?


I guess what features on my blog differs from the many other craft blogs out there because I am just a beginner. A lot of craft blogs out there are from the perspective of crafters who have an established product or products and are selling them whereas I am just figuring out and documenting the basics.

Why do I write/create what I do?

The aim of my blog is to inspire crafters of all levels to just get the glue out and make. I think crafting is such a joy to do and is wonderful for your mental health particularly nowadays when everything is so instant and rushed; it's nice to work with your hands and have to take time to complete a project.

In my weekly Tiddlybits, I put together a list of links to all the great ideas I come across on Pinterest in the hope that they inspire people to create wonderful stuff of their own.


This week I've also featured creative baking ideas as I also love baking and think that's another great with to get creative and might suit people who don't want to spend hours elbow deep in Papier-mâché!

How does my writing/creative process work?

For the posts about the crafting projects I attempt, I take pictures for every step of the project and then I will either create a step by step tutorial using the pictures and written instructions or if it was a relatively simple project, just let the pictures do the talking! I usually write a little about why I decided to take on that project and the lessons I've learned from the process too.

For the weekly Tiddlybits, I pick a theme usually sparked by something I've found in my house and I wonder about all the different things you could do with it. I then create a secret board on Pinterest and pin all the great ideas on the theme I find in there. Then I pick out 4 or 5 favourites and pop pictures of  them in a blog post with comments on why I think they're so good as well as links to the blogs/websites where they were originally posted.


For my new Morning Walks feature, I just take pictures when me and my boyfriend are out walking. I edit them in Photoshop creating a collage of the various photos and then upload that to Tiddlybobs. As the aim is just to inspire people I don't usually write anything in order to let the pictures speak for themselves. 

Who am I tagging?

It's EXTREMELY difficult to pick three as there are so many great blogs out there but these three are my current favourites! 

My first tag goes to Tinkered Treasures who's blog is so beautiful and cute especially the recent Girlie  Office feature - which I am now totally jealous of! 

My second tag is for Turquoise Autumn which is full of stunning photos and I love the Wilderness Wednesday posts. 

And finally, The Villa on Mount Pleasant  who creates the most stunning vintage interiors and gives me serious house envy. 

Fire burn and Cauldron Bubble

The aim of Tiddlybobs is not only to inspire your makes but also to inspire your bakes. I find it extremely fun to put a twist on a traditional bake, like my piña colada cupcakes (picture below), so I decided to make this weeks Tiddlybits all about creative baking. These creative bakes are all inspired by Hallowe'en so I hope they do give you some ideas for your party bakes for October 31st. 


If you do try any creative bakes after being inspired by this blog please do send me pictures  of them via Twitter @Tiddlybobs or to tiddlybobs@gmail.com as I'd love to see them! Also, please visit my Pinterest board for more ideas if none of these take your fancy. 

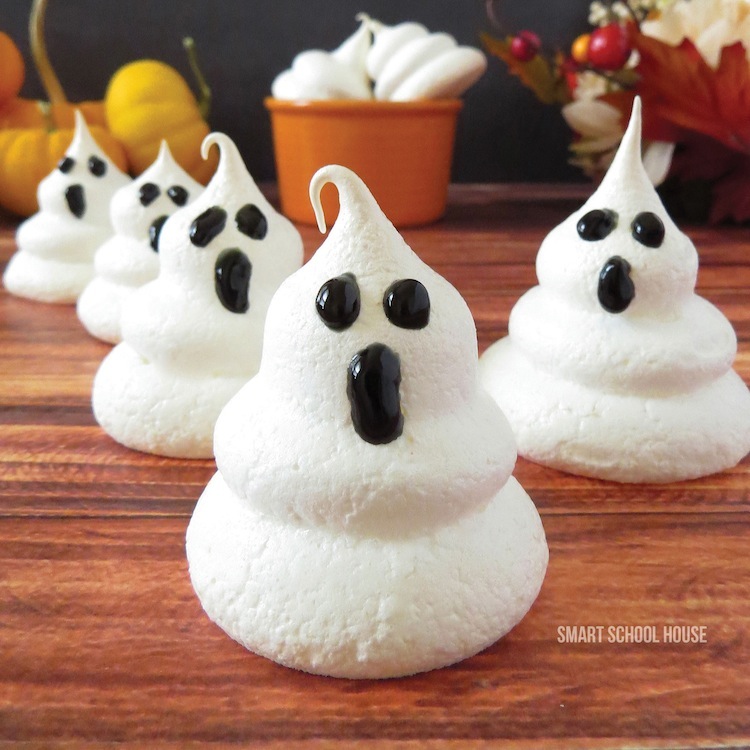
First up are these awesome ghost meringues from Smart School House. They don't require many ingredients so you can keep your costs down and also they don't take long so top marks all round for this idea!


So you've made pound cake before but have you ever made pound cake with a pumpkin INSIDE?? Nope didn't think so! This peekaboo pumpkin pound cake recipe a fantastic idea from Sandra Denneler at SheKnows. 


Unfortunately I can't find a tutorial for these awesome Voodoo Doll cookies found on indulgy.com. But here is a recipe for Gingerbread Men from NetMums so just whip them up and make up some different colour icing and get creative!


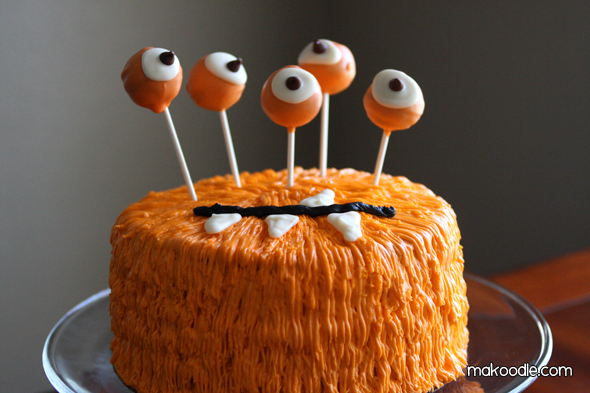
I love this monster cake from Makoodle. So simple yet so creative. You could also use different colours on the cake and eyes, play around wight he heights of the eyes or even put the mouth on the front instead of the top to make your bake truly unique. 

That's it for this weeks Tiddlybits! 

Happy Baking!

For the wonderful Annabel

My amazing friend Annabel is currently going through a course of chemotherapy treatment which she is being super brave and open about. She is blogging about her experience and you can read about  it here. She has also asked her friends to complete a serious of challenges to keep her uplifted during the course of this treatment which will last until Christmas. It's such a wonderful idea and I hope it really does help her through this difficult time.

This time the challenge was to create a Christmas themed pom pom so I have created this Christmas tree and I decided to blog about it in true Annabel style.


I followed this tutorial from One Sheepish Girl but as I didn't have pom pom makers I used this hand technique for the bark of the tree and then I used a tin can for the Christmas tree, to get a bigger pom pom. I then cut out gold ribbon to make a star and sewed all the bits together.

Annabel you are an incredible woman and I am with you all the way as you go through this difficult time. Huge love! xxxx

Go on - cover it up!

Life is a bit hectic at the moment so I'm only getting the chance to do small projects but a little is better than nothing! My newest project is a paper covered envelope.


I always keep a momento of the places I go to, e.g. cinema, theatre and museum tickets, but I have nowhere to keep them. Then my boyfriend gave me an envelope from a recent Amazon delivery and I thought it would be the perfect place to hold all my keepsakes. However, it needed some TLC so out came the glue and paper and a beautifully covered envelope was born!


Cut from a Different Cloth

It's that time of the year when the long sleeved t-shirts are coming out and the short sleeved t-shirt  is going away until next Summer or if it's seen better days, it's about to be thrown in the bin. But before you chuck it, stop and have a creative think. Maybe there's something else you could do with it?! And so in steps this weeks Tiddlybits with creative inspiration for all your t-shirt related crafty goodness!


The first thing you need to learn, before embarking on any t-shirt craft projects, is how to make yarn from a t-shirt. It's so versatile and easy to do too. This tutorial from Simply Crochet Mag explains how to make it and is super simple to follow. 


You can put your t-shirt yarn straight to work making these super pretty coasters with a vintage feel. The tutorial featured on Mom It Forward and is from Jenn at Endlessly Inspired - which is a blog I urge you to check out if you're looking for ideas for your next project. 


A more advanced project is to make a basket from t-shirt yarn using crochet. This great tutorial from Instructables will get you making tonnes of these in no time and as you get more confident you can upscale the methods to make bigger baskets!

Another great tutorial from these folks is this no-sew t-shirt bag. I'm a bit dubious about how much weight it could hold but definitely a cool idea and worth a try.


And speaking of no sewing, if you are not into all this yarn business how about you try this no sew pillow from Dream Book Design? It is so classy and easy to make - the perfect combination.


I hope that this weeks Tiddlybits has at least planted the seed of a creative idea in your brain but if not head over to my Pinterest board for lots more inspiration. 

Happy Crafting! 


Something Wicked This Way Comes

It's almost October which means it's Hallowe'en planning time! I absolutely love Hallowe'en though I have to say since moving to London, it's been a bit rubbish. The atmosphere in Ireland is much better around this time and everyone is much more into it! However, that doesn't mean things can't change so consider this weeks Tiddlybits inspiration for the world to get as into Hallowe'en as Ireland is and hopefully there's a few tricks to inspire the Irish readers to up their game too!


An easy one to get started - just pop some fake eyeballs in your flowers and BOOM! Creepy Hallowe'en decor gold! Thanks to Deeds McGoo for pinning this great idea.


Even though I'm posting this in September, I am sure that there will still be some of you who will be in a blind panic on 30th October having not done anything to your house or bought any sweets. NEVER FEAR! Here are 31 quick and easy Hallowee'en hacks - my personal favourite being the the fake teeth napkin holders. 


Another great and simple idea is to turn your wine bottles (or alcohol beverage bottle of choice!) into potion bottles! This excites me no end and you can download free label templates here at Ellinee or create your own if you are feeling super creative. 


I am definitely trying this one from Momtastic Webecoist mainly because I've never photocopied my own face and I'm not sure I can leave my twenties having never done so. There's also several other awesome eco projects to try via that link so do check it out. 


Do I even need to tell you that you should definitely do this one? Creepy as hell! Just make sure you put her away before you go to bed! It's just a doll spray painted white surrounded by white sheets. I couldn't find a tutorial but the link to the original photo I found is here. 

That's my highlights but as usual please find lots more ideas on the Pinterest board and please send pics of your creations to @Tiddlybobs. 


A Recipe for Colouring In

I am firmly aware that I am unable to draw and having a brother who is a graphic designer and a boyfriend who is an illustrator does nothing but confirm that. However, I do still enjoy having a dabble now again and there is nothing more relaxing in this world than colouring in - anyone that says differently is lying. 

I was kindly gifted with a blank recipe book last Christmas and today (Yes, only today!) I decided to start filling it. As I'm just learning to bake I don't have a lot of recipes that I do over and over again or even recipes that turn out the exact same the second time around except for this jam tart recipe. It's super quick and has yet to go wrong so I decided it deserved pride of place as the first recipe to be put in my book. 


The book contains a blank page on one side and lined pages on the other so it's just made for accompanying your recipes with illustrations - well, I thought so anyway. 

I'm pretty pleased with the result considering my drawing skills but besides that, it was super fun and just so relaxing to do! If you haven't done any drawing or colouring in since primary school, I demand that you do so straight away. You'll love it! Can't wait to master more baked goods so that I try out more recipe inspired drawings! 

To peg or not to peg

Sticking with the theme of using stuff you find around your house for your crafting projects, this week's Tiddlybits is all about the weird and wonderful things you can make from clothes pegs. 


First up are these easy to make clothes peg magnets from the Daily Fix and though I love the floral design, the great thing is that you can mix it up with any design you want. I'm seriously considering Harry Potter themed magnets... if only I can get my housemates to agree...


This has been pitched as kid sized for kids but I'm sorry it's way too awesome! I demand you find yourself a larger box and make this adult sized! Genius idea from U Create!


So this blog post is not in english but the pictures are really good so you should be able to follow the tutorial quite easily. It's such a great idea and reminder that peg crafts don't just stop at the wooden bits!


Too many cables? Too little time? This is a genius idea for a pin cable tidy and plus there's a few other ideas if you're looking for more inspiration to support your technical organisation needs.


Okay so this is not a tutorial nor is it credited to anyone as I couldn't find the source but I couldn't resist posting it. It's a Christmas tree made from pegs to hold lollipops! Do you understand how much of that sentence is soooo right?

And on that note, that's it for this weeks Tiddlybits. Please check out the Pinterest board for more clothes peg crafting inspiration!


Bump on a Glued Tin Can

Recently I have got a new desk and I have a load of different projects on the go at once so the need for good organisation is becoming vital. Last weeks Tiddlybits served to inspire you to get busy crafting with tin cans but it's ended up inspiring me to make something of my own. I decided to cover some tin cans in pretty paper and use them to hold all my pens and brushes so they're not cluttering up my desk.

I used the same tutorial as I used for my hair tie and bobby pin holder and even though this time there was less excess paper that needed to be hidden, there was a lot of bubbling of the paper! But progress is progress so hopefully it'll be third time lucky when I try this technique again. Meanwhile enjoy the pictures and please send me pictures of your tin can projects via twitter - @Tiddlybobs. 


Let her try and make a beehive out of me!

You may not be as evil as the Wicked Witch threatening to make a beehive out of your tin man but you can make many other wonderful things with them and this weeks Tiddlybits is all about just that!


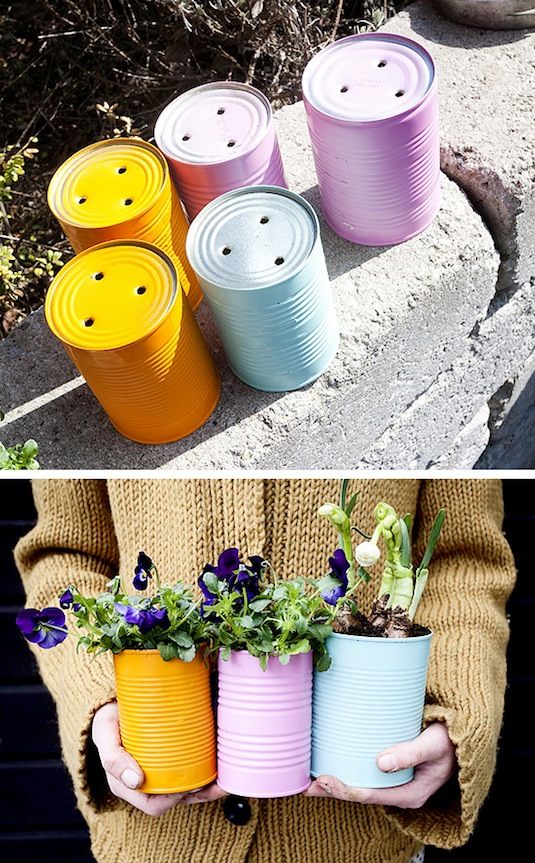
This gorgeous planters from Dos Family courtesy of their April Buddy Deer Dot are simply made by painting your tin cans and adding a few drainage holes with a drill in the bottom and voila! Beautiful, unique plant pots.


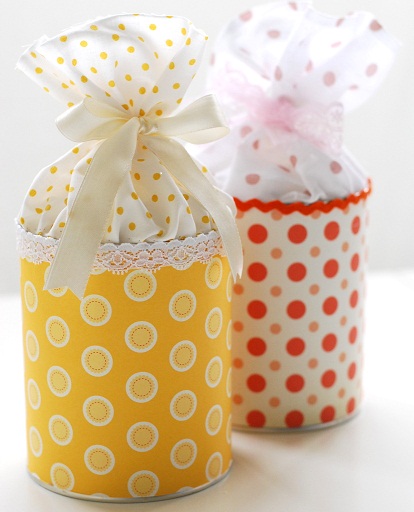
As you all know I am obsessed with gift wrap and I love this idea from BlingBling of using tin cans as wrapping for biscuits and sweet things. You can find the tutorial here. It's not in the english but the pictures are great so you should be able to follow it without much difficulty. 


This is a great idea from Design Sponge as part of their DIY Wednesday's for making a perpetual calendar from a tin can. You can also store your pens in it so it's perfect if you haven't got much desk space. 


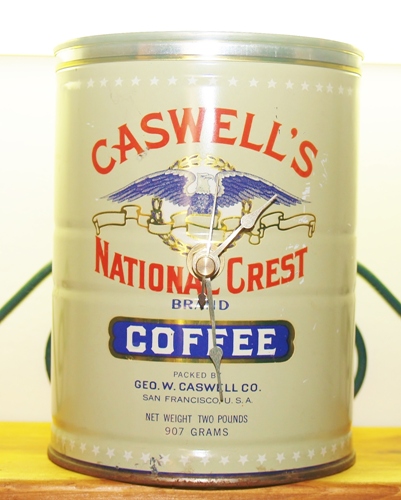
I love, love, love this idea of making a clock from an old tin can. So easy but absolutely brilliant result and I'm definitely making one of these for my desk. You can find the tutorial here on the Kelli's Kitchen blog. 


As we've not got long until the bad weather of Winter is upon us we need to grab a few more evenings in the garden before it's too late and what better way to set the mood then with these fabulous  tin can lanterns? And thanks to this brilliant tutorial from Grow Creative.

And if you're not satisfied with all of that, maybe you could try make your very own Tinman complete with a heart. 

Photo via Barbs Hackleton
For more tin can inspiration please visit my Pinterest board and happy crafting!


If you go down to the woods today...


I have been waiting on my sewing machine being delivered before taking on any sewing projects but I couldn't wait to try this one. I came across this picture tutorial on making a teddy bear from a sock quite a while ago on Pinterest and it's been playing on my mind since. So last night, out came an old pair of socks and my sewing kit. The socks I was working with were a pair of knee high socks so a LOT bigger than the ones in the tutorial and then I messed up cutting out the head so I ended up working with my own imagination to make my own version! 


I'm not too happy with the stitching in places and how visible it is so that's something I will work on when making another one. I also got very impatient when sewing so the gaps between stitches are quite big which I'm sure means that the stuffing will start making an appearance at some point. 

My plan is to redo everything when my sewing machine arrives to prevent the stuffing escaping and to make it neater. I also want to work on my hand stitching to be able to hide the stitches when I have to attach certain bits by hand. 


BUT in saying all of that I absolutely love this little teddy and I'm quite proud that I was able to make it myself! I am very excited to make many more and possibly try this monkey if I'm feeling brave! But first I've got to think of a name for him...


A Stitch in Time

One of my discoveries during my many hours on Pinterest has been Embroidery Art. I am constantly amazed by what people can create with just a needle and thread - the texture, the light and shadow, the beauty! It's outstanding and though I can only hope to achieve half the greatness of these artists I couldn't resist having a go myself. 

Tonight I created this scene based on the Irish Myth of 'The Salmon Of Knowledge' about a boy who gains all the knowledge in the world when he tastes part of the fish known as the salmon of knowledge. 


I must say I'm super pleased with the results for a first try. It's a bit messy and I could have planned the stitches better so the overall effect was more symmetrical but overall I like it. Plus the whole process was really relaxing! Next embroidery project here I come!